Hi everyone,
We’d like to share a simple program we developed for color block recognition and 3D curve extraction using the AgileX PIPER robotic arm. The project leverages OpenCV with depth and color data from a depth camera, enabling 3D coordinate extraction of color targets that can be applied to basic robotic grasping and trajectory tracking tasks.
We hope this example can serve as a starting point for anyone exploring computer vision–based manipulation with lightweight robotic arms. Feedback, improvements, and pull requests are always welcome!
Abstract
A simple program for color block recognition and 3D coordinate extraction, utilizing the OpenCV library. It performs recognition using depth information and color data from a depth camera, and the extracted 3D coordinates of color blocks can be applied to simple robotic arm grasping tasks.
Keywords: Color Recognition, 3D Curve Extraction, Curve Fitting, Curve Interpolation, AgileX PIPER
Code Repository
GitHub link: AgileX-College/piper/cubeAndLineDet
Function Demonstration
Teaching a Robot Arm to Spot Colors & Draw Curves
Preparation Before Use
Hardware Preparation
- Orbbec Petrel (with aligned depth images and RGB images: 640×400@30fps)
- (Optional) Intel RealSense D435 (with aligned depth images and RGB images: 640×480@30fps)
- AgileX PIPER Robotic Arm
Software Environment Configuration
- Compile and install the PCL point cloud library. For Linux compilation examples, refer to the official documentation. The
on_nurbsoption needs to be specified during compilation. - For PIPER manipulator driver deployment, refer to: piper_sdk
- For PIPER manipulator ROS control node deployment, refer to: piper_ros
Functional Operation Steps
1. Start the Color Block Detection Node
- Start the depth camera ROS driver node (example: Orbbec Petrel):
roslaunch astra_camera dabai_dc1.launch
- Start the color block detection node. Two image windows will pop up:
hsv_imageandorigin_image. Adjust HSV parameters inhsv_imageto find specific colors, or click inorigin_imageto extract the target color automatically:
rosrun cube_det cube_det

-
Example of automatic color search:
-
The 3D coordinate information of the detected point will be visualized in rviz:


2. Start the Curve Detection
- Start the depth camera driver:
roslaunch astra_camera dabai_dc1.launch
- Start the curve detection node. It uses a built-in curve fitter and interpolator to make the output curve continuous and smooth:
rosrun cube_det line_det
-
Click the target curve in
origin_imageto extract and search automatically. -
Open rviz to view the converted point cloud curve:
-
Start the manipulator’s ROS control node:

# Find the robotic arm CAN port
./find_all_can_port.sh
# Connect to the CAN port
./can_activate.sh
- Start the manipulator motion node:
roslaunch piper start_single_piper.launch
- Start inverse kinematics. Reference: piper_ros Pinocchio README
python piper_pinocchio.py
- Set a manipulator home position:
rostopic pub /pos_cmd piper_msgs/PosCmd "{
x: -0.344,
y: 0.0,
z: 0.110,
roll: 0.0,
pitch: 0.0,
yaw: 0.0,
gripper: 0.0,
mode1: 1,
mode2: 0
}"
-
Visualize the generated end-effector control path
/line_pathin rviz:
-
Start the manipulator motion path loading and end-effector control program:

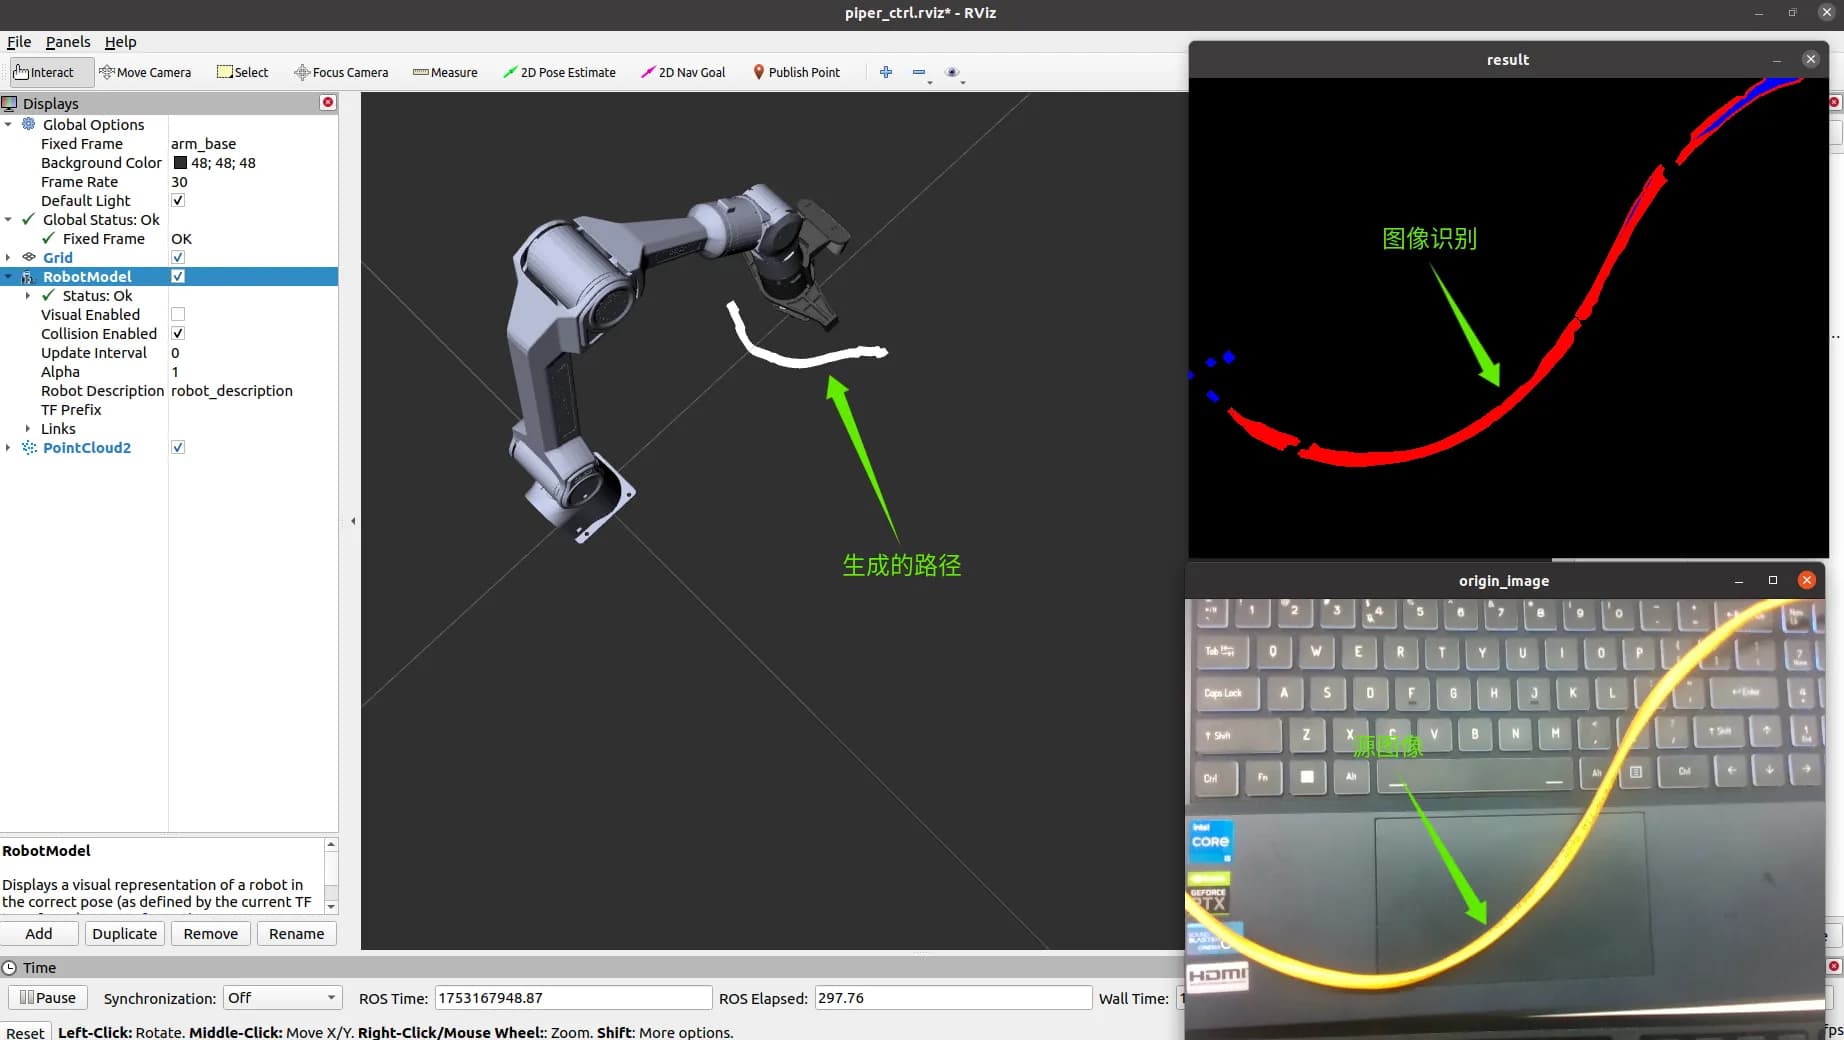
rosrun cube_det path_confer.py
path_confer.py supports three operations:
r: Record the current frame point cloud, transform toarm_basecoordinates, and generate a path.s: Send the recorded path point by point.p: Publish the entire path cyclically.
-
After recording (
r), the transformed path/transformed_cloudwill be shown in rviz:
-
Press
sorpto control the manipulator to follow the generated trajectory.

Conclusion
This project demonstrates how the AgileX PIPER robotic arm can be combined with depth cameras and OpenCV to achieve:
- Color-based object detection
- 3D coordinate extraction
- Curve fitting and interpolation
- Trajectory execution with inverse kinematics
All source code and setup instructions are available in the GitHub repository.
If you try this out or extend the functions, we’d love to hear your feedback and results. Please feel free to share your experiences or raise issues in the repo.
Thanks for reading, and happy coding! 